What are React Props? and How to Use Them for Dynamic Data Output?

I am a web3 developer and I am passionate about CyberSecurity
Also writes on Medium - medium.com/@sahilchandravanshi/
What is React Props?
Props are an acronym for "properties." Props are arguments that are passed into React components, providing a method for passing data from one component to another. They enable components to be reused.
The component receives props in the same manner as function parameters.
HTML attributes are used to pass props to components.
As I mentioned in the opening, the concept of props is built on the idea of components. So, without a component to work with, we can't use props successfully.
Below is the structure of the parent component (i.e. App.jsx)
import './App.css'
import Card from "../components/Card/Card";

const App = () => {
    return (
        <div className='App'>
            <Card />
        </div>
    );
};

export default App;
Below is the structure of the child component (i.e. Card.jsx)
import React from "react";

const Card = () => {
    return (
        <div id="card">
            <img src="<https://i.postimg.cc/dQ7zWbS5/img-4.jpg>" alt="img" />
            <div className="info">
                <h2>Ella</h2>
                <p>Work: Student</p>
                <p>Hobby:Reading </p>
                <p className="bottom">From: Spain</p>
            </div>
        </div>
    );
};

export default Card;
Let’s add some styling to our card component because who doesn’t like styling ( in App.css )
* {
    margin: 0;
    padding: 0;
    box-sizing: border-box;
}

.App {
    display: flex;
    justify-content: center;
    gap: 1rem;
    flex-wrap: wrap;
}

#card {
    width: 17rem;
    height: 10rem;
    padding: 1em 0.1em;
    background: #f4f3ee;
    box-shadow: 1px 1px 5px 1px rgba(0, 0, 0, 0.59);
    z-index: 5;
    border-radius: 5px;
    display: flex;
    justify-content: space-evenly;
}

#card img {
    width: 6rem;
    border-radius: 5px;
    margin-right: 20px;
}

#card h2 {
    font-family: courier;
    color: #333;
}

#card p {
    color: #555;
    font-size: 13px;
}

#card :nth-child(4) {
    margin-top: 30px;
    color: #212138;
    font-size: 0.85em;
}
After that, our code and react app will look like this
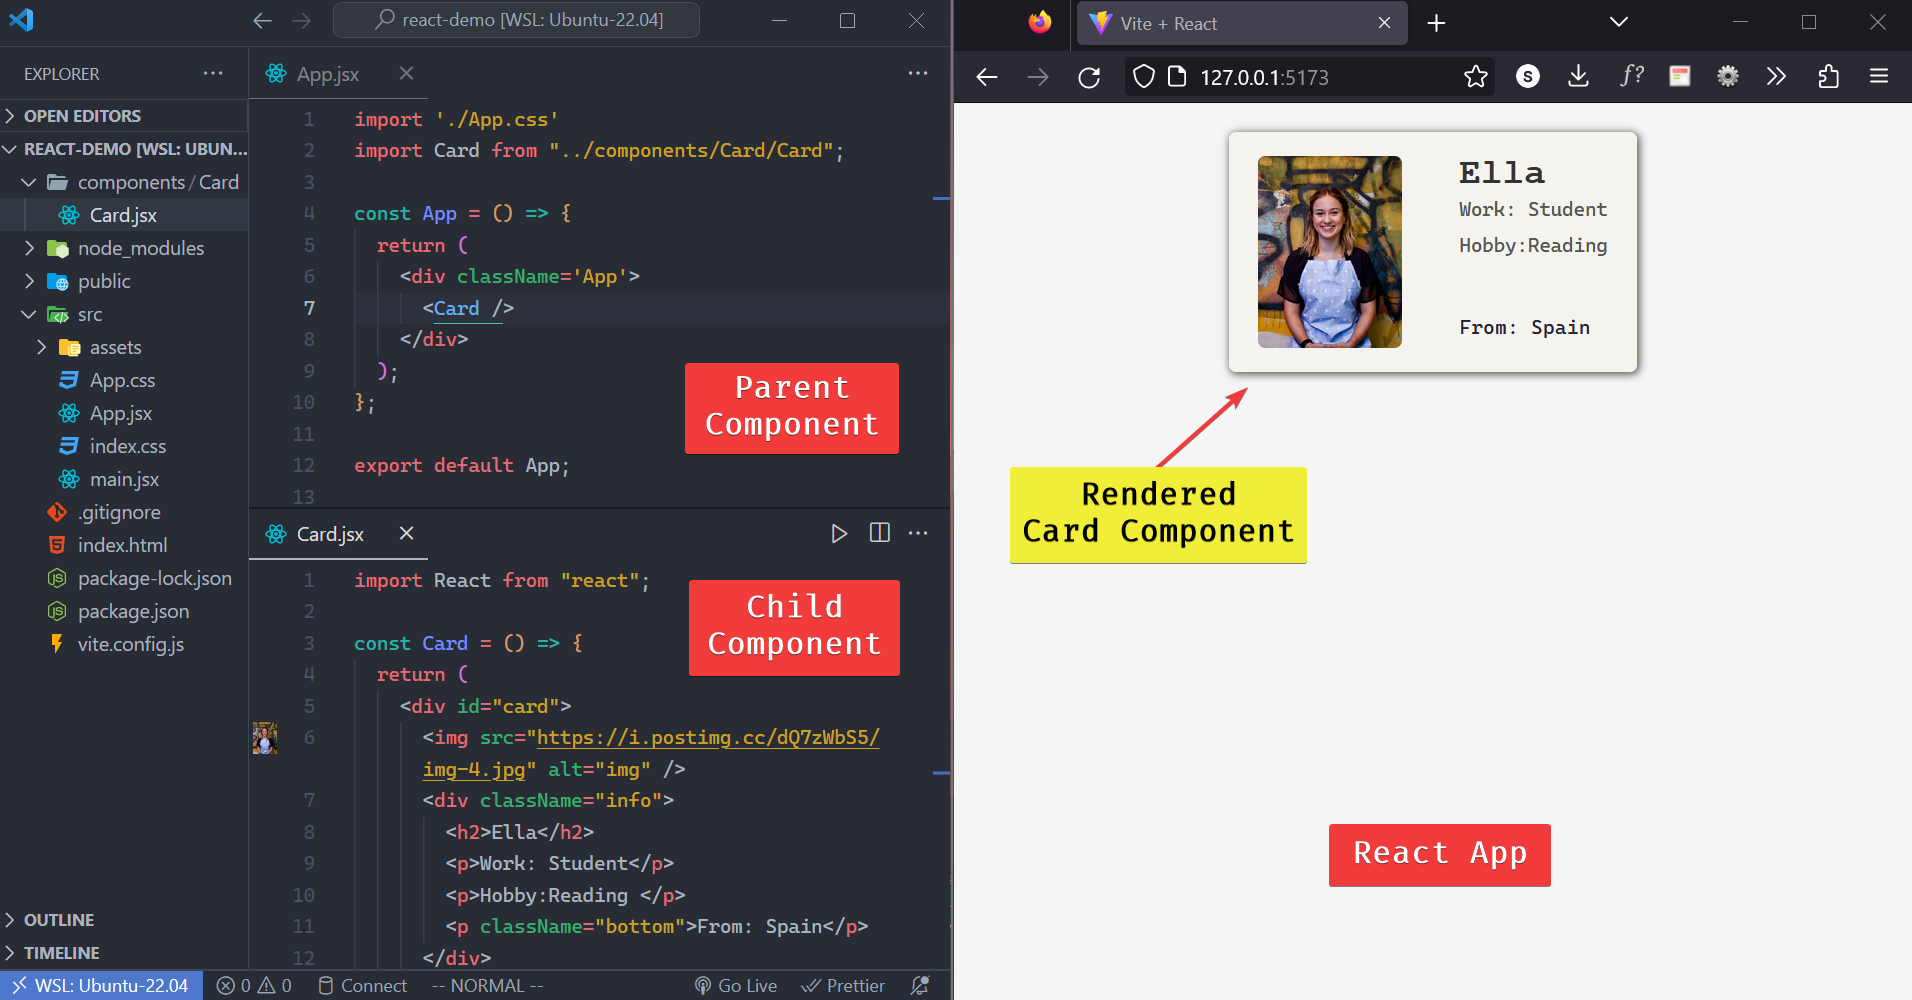
Our goal is to be able to display information about people which vary in name, work, hobby and origin. We are using a simple card component to display information about a person here.
The card component can be reused multiple times by simply re-rendering it. For example:
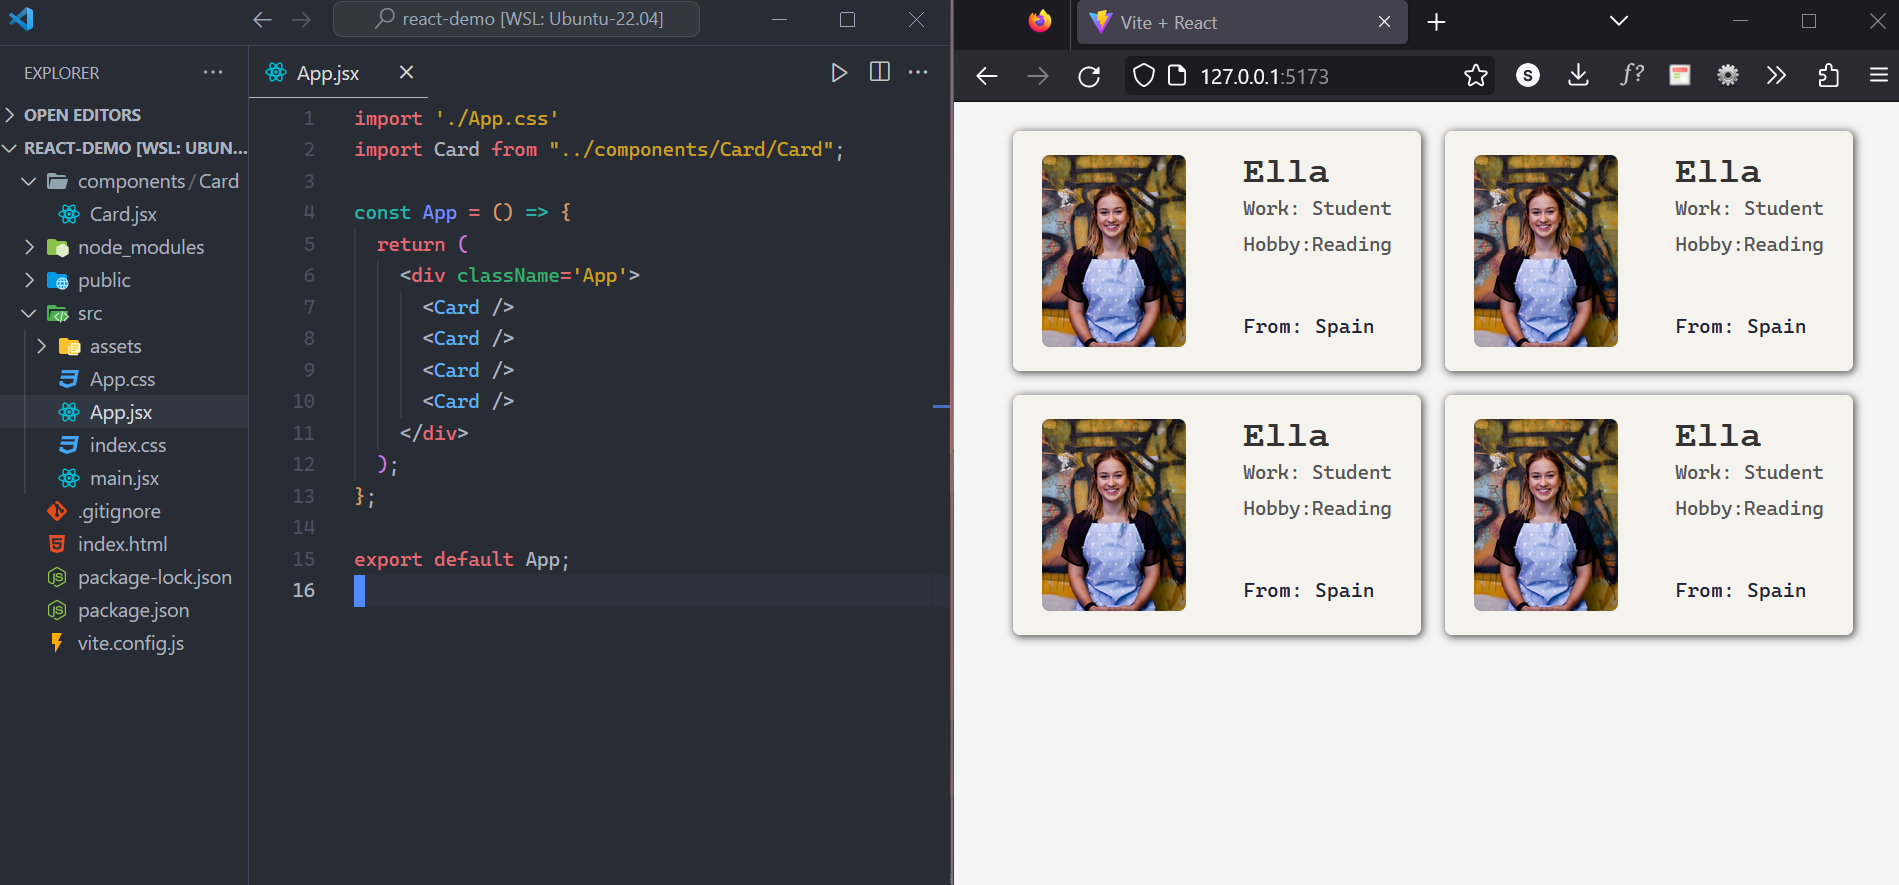
Isn’t it amazing! The React functionality of repeating a particular design without writing much code is evident.
But we still haven't accomplished our goal, right? While we want to reuse the component, we also want to update the name of the person, work, hobby, origin and image without having to hardcode any data in the Card.jsx component.
This is where we can use props in React to make our data output dynamic.
How to Use React Props
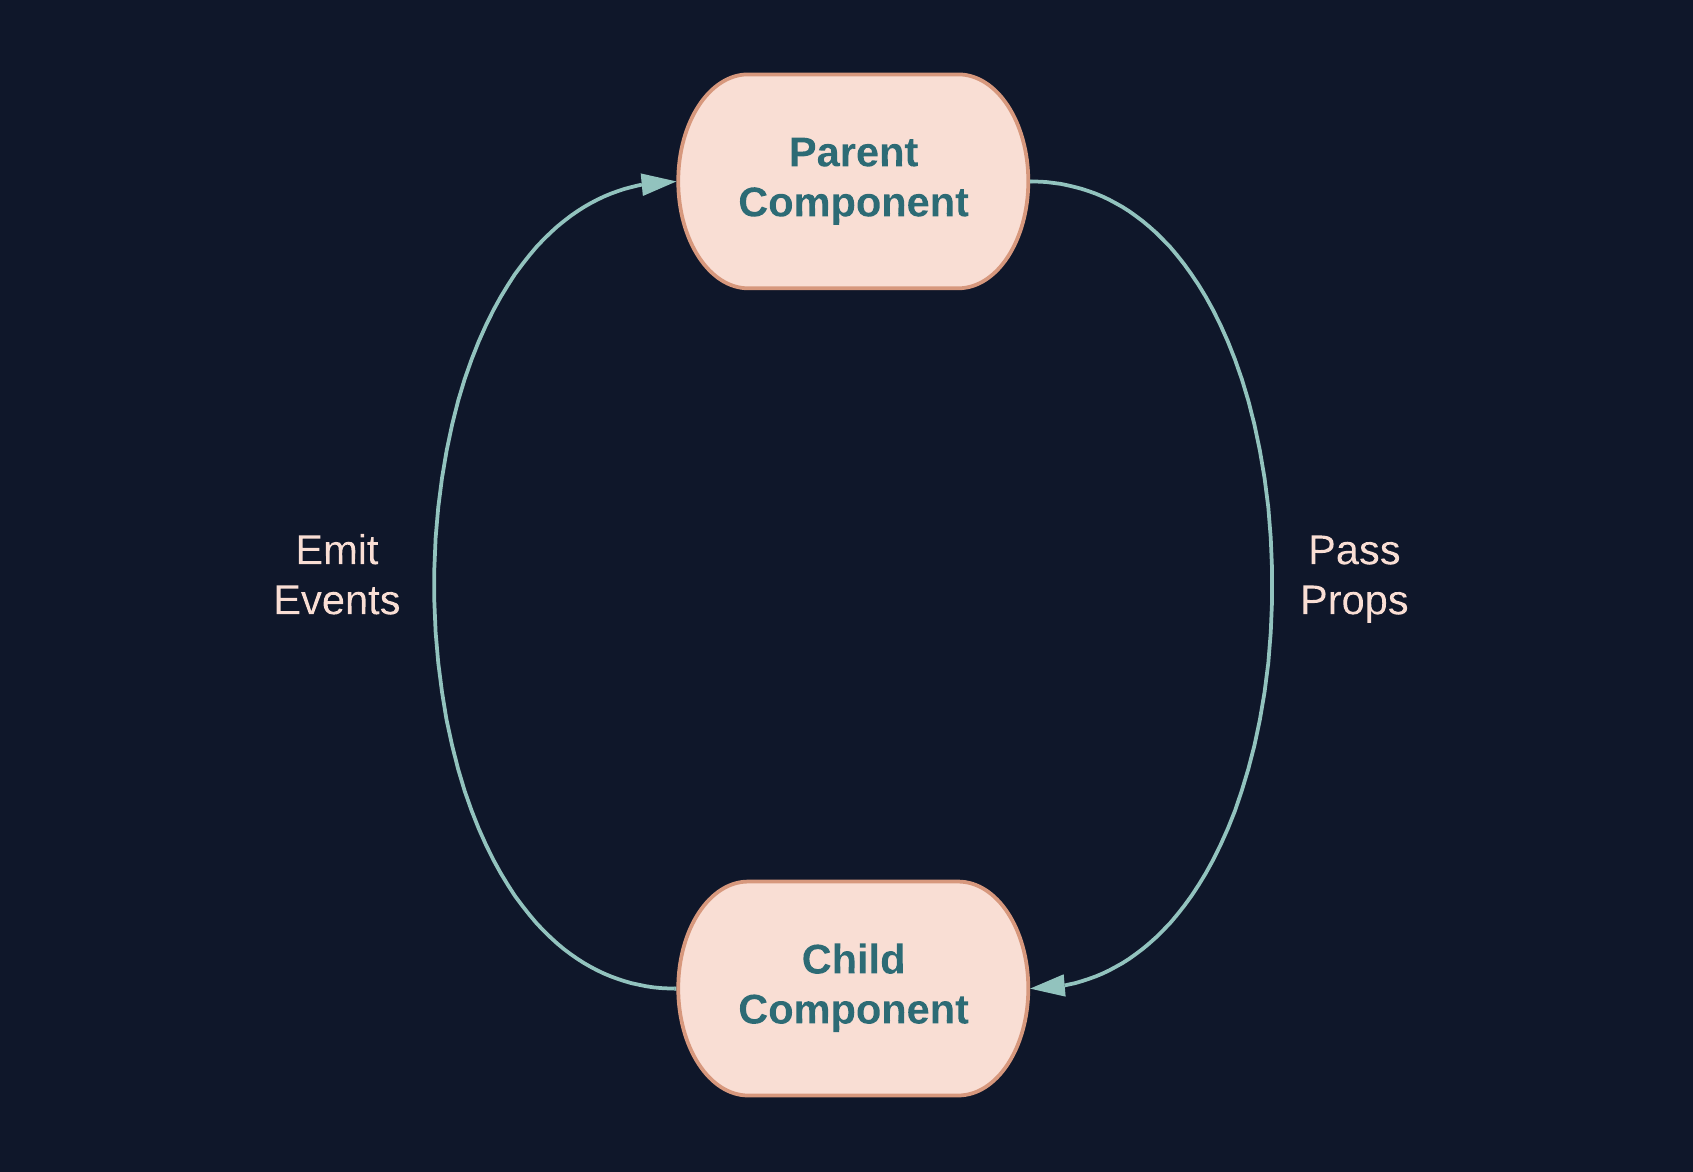
📝Note: In React, data flows in a one-way direction from parent to child components. This unidirectional flow ensures that child components cannot modify data passed from the parent.
Our data will be passed from App.jsx which is the parent component to Card.jsx which is the child component (and never the other way).
How to Send Props into a Component
The passing of props into a component is analogous to the functioning of attributes in HTML elements.
To pass attributes into an HTML input element, you simply write the attribute and attach its corresponding value., just like this:
<input type="text" placeholder="text" />
When sending props, which are similar to attributes and properties, you can attach values to them.
Below is the syntax:
<ComponentName property1="value" property2="value" property3="value" />
Assigning a value to each property is done within the component tag after writing the component name.
Now let's use the syntax above to pass data into the App.jsx component:
<Card
    img="<https://images.pexels.com/photos/1878687/pexels-photo-1878687.jpeg?auto=compress&cs=tinysrgb&w=800&lazy=load>"
    name="Alex"
    work="Designer"
    hobby="Painting"
    origin="Australia"
/>
In the code above, the component name within the tag is Card and the first property or prop is img with its value https://images.pexels.com/photos/1878687/pexels-photo-1878687.jpeg?auto=compress&cs=tinysrgb&w=800&lazy=load attached to it. Then we have the name which is the second property and so on (with assigned values).
📝Note: There's a slight difference between writing HTML attributes and passing in props: while HTML attributes are special keywords already provided for you, you customize and define props in React.
For example, I created the properties;
img,name,work,hobbyandoriginabove. Then, I attached the values of the props alongside them.
How to Access and Use Props in React
The component receives props as a function parameter. It uses the value of props by defining the parameter as props objects.
📝Note: React uses the value of props by defining the parameter as props objects.
Below is the syntax:
//the function receives 'props' as a parameter
const ComponentName = (props) => {
    return (
      <div>
        <img src={props.objectName} alt="image" />
        <h1>{props.objectName}</h1>
      </div>
    );
}

export default ComponentName;
Let's relate the syntax above to our Card.jsx by receiving props as a parameter function and by defining props as object:
import "./App.css";
import Card from "../components/Card/Card";

const App = () => {
    return (
        <div className="App">
            <Card
                img="<https://images.pexels.com/photos/1878687/pexels-photo-1878687.jpeg?auto=compress&cs=tinysrgb&w=800&lazy=load>"
                name="Alex"
                work="Designer"
                hobby="Painting"
                origin="Norway"
            />
        </div>
    );
};

export default App;
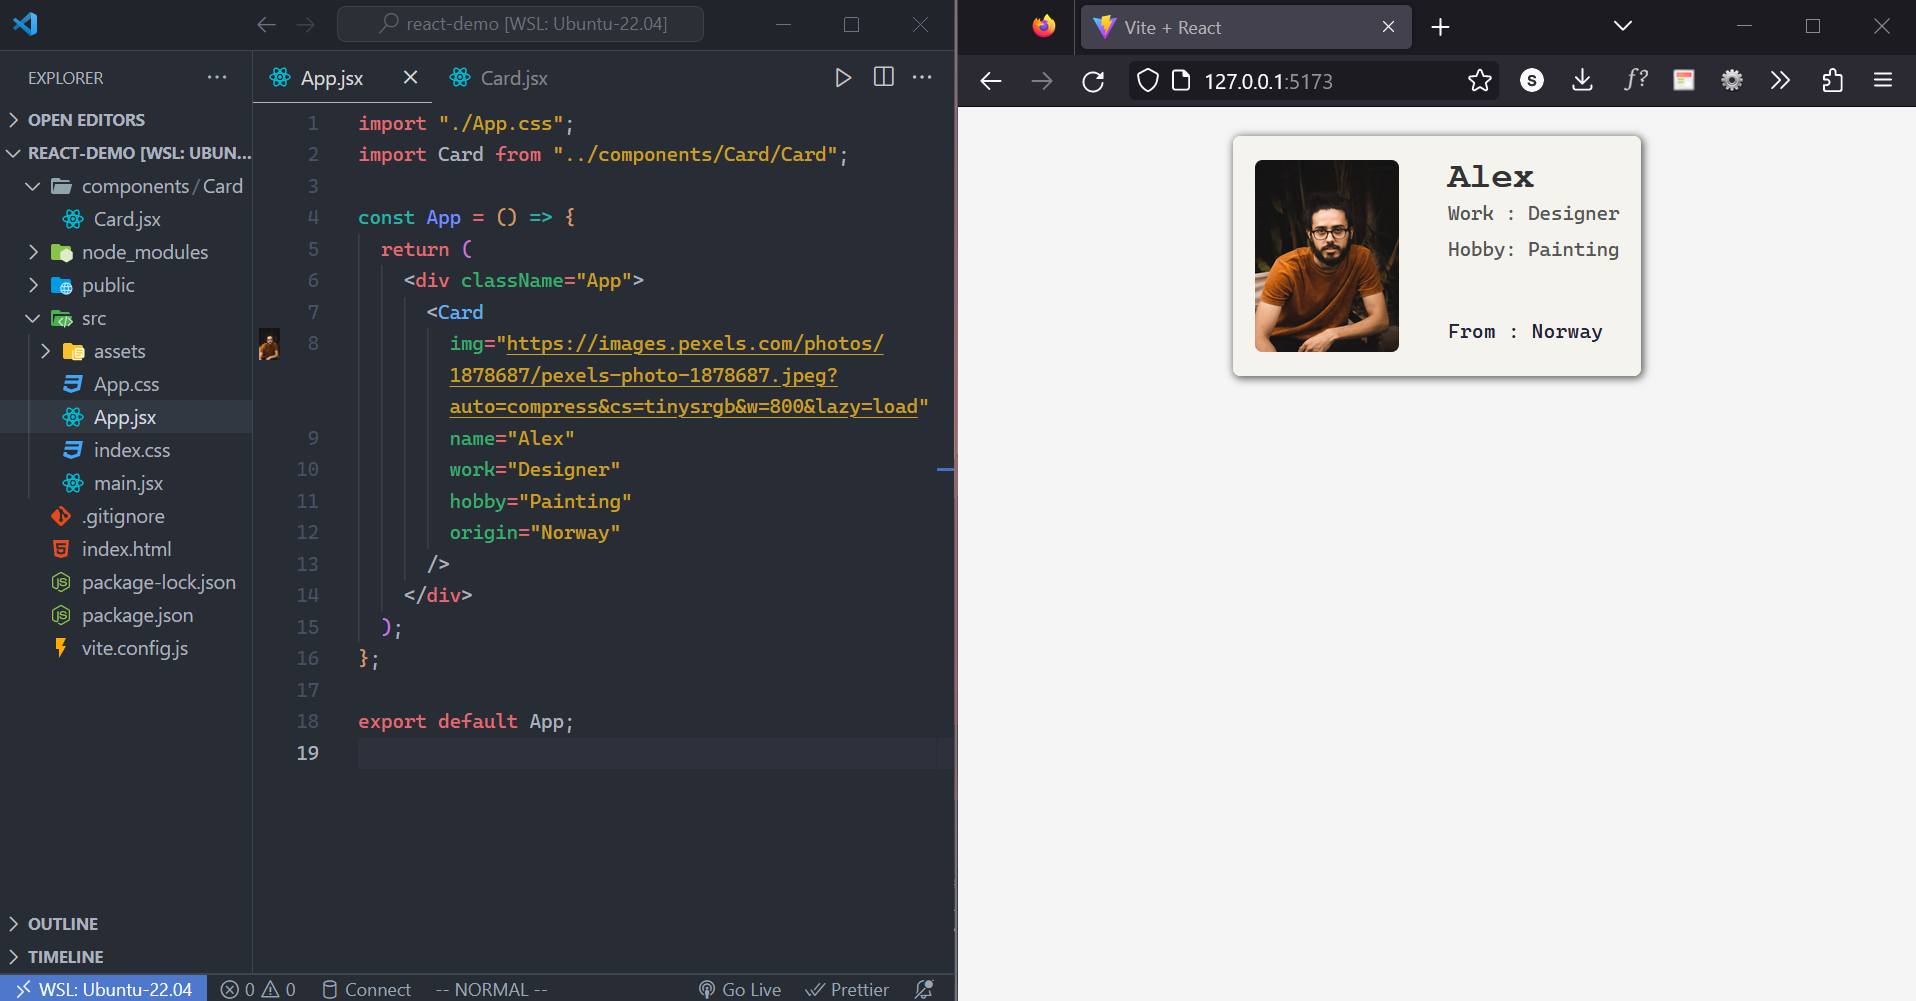
We have successfully made the data we passed into the Card.jsx component dynamic.
To reuse the Card.jsx component to show the data of other people, all we need to do is to attach the new data or values when re-rendering the component.
import "./App.css";
import Card from "../components/Card/Card";

const App = () => {
    return (
        <div className="App">
            <Card
                img="<https://images.pexels.com/photos/1878687/pexels-photo-1878687.jpeg?auto=compress&cs=tinysrgb&w=800&lazy=load>"
                name="Alex"
                work="Designer"
                hobby="Painting"
                origin="Norway"
            />
            <Card
                img="<https://images.pexels.com/photos/1130623/pexels-photo-1130623.jpeg?auto=compress&cs=tinysrgb&w=1260&h=750&dpr=2>"
                name="Sofia"
                work="Blogger"
                hobby="Cooking"
                origin="Brazil"
            />
        </div>
    );
};

export default App;

Destructuring Props in React
Now that we’ve achieved the functionality we aimed for, let’s format our Card.jsx by making use of destructuring. This JavaScript feature entails transferring bits of data from an object or array to another variable so that the variable may store the data from the array or object.
Props are objects. The first step in destructuring an object in React is to arrange its properties within a set of curly braces. Next, you can either send it as a parameter directly to the method or save it in a variable named props.
Now, receive the properties where you need them by specifying their names without the prefix props.
Two ways to destructure in React:
First method:
const ComponentName = (props) => {
//First Step: Destructuring within the body of the function
    const {img, name} = props ;
    return (
//Second Step: receive the properties where you need them by stating the names
      <div>
          <img src={img} alt="image" />
        <h1>{name}</h1>
      </div>
    );
}

export default ComponentName;
Second method:
//First Step: Destructuring within function's parameter
function Product = ({img, name}) => {
    return (
//Second Step: receive the properties where you need them by stating the names
      <div>
          <img src={img} alt="products" />
        <h4>{name}</h4>
      </div>
    );
}

export default Product;
Let’s see this in our app
It looks clean and nice! Destructuring in React makes our code more readable and more concise.
How to Set a Default Value for Props
The defaultProps is a React component property that allows us to set default values for the props argument. It usually comes in handy when we don’t have any props data passed in.
Let's go ahead and create a default prop for our app:
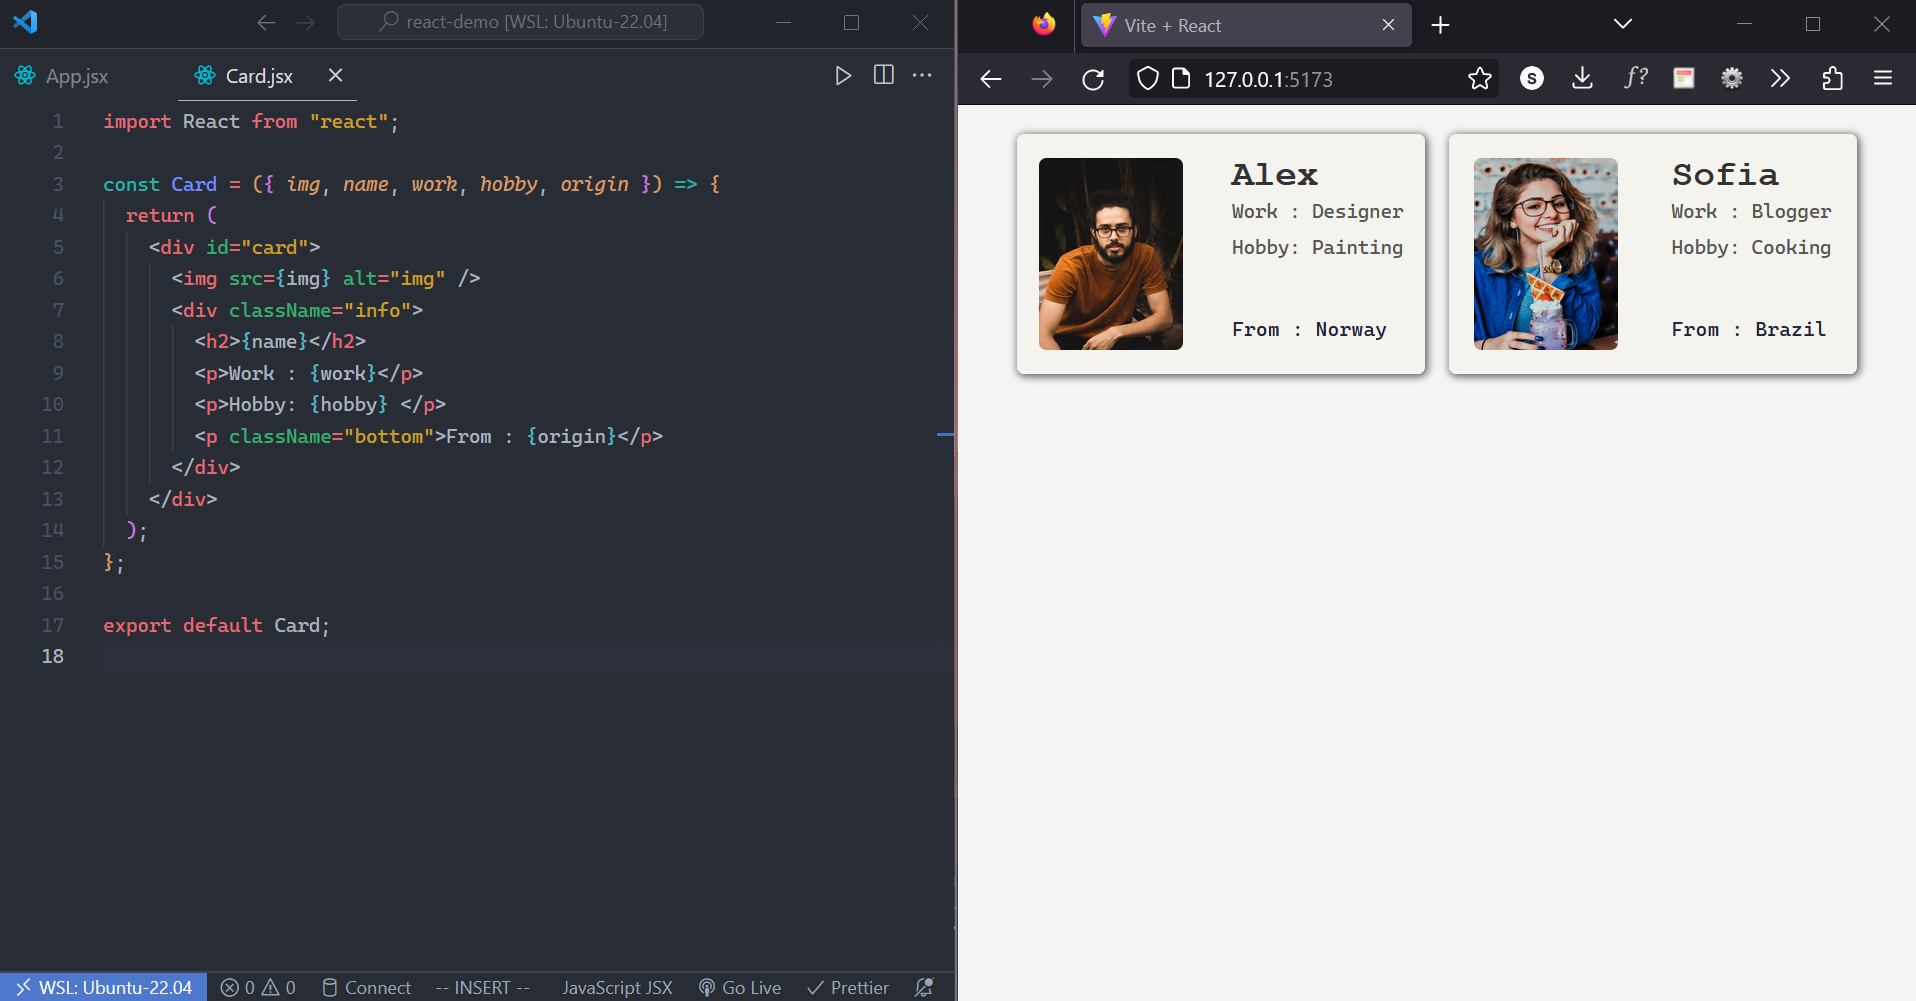
import React from "react";

const Card = ({ img, name, work, hobby, origin }) => {
    return (
        <div id="card">
            <img src={img} alt="img" />
            <div className="info">
                <h2>{name}</h2>
                <p>Work : {work}</p>
                <p>Hobby: {hobby} </p>
                <p className="bottom">From : {origin}</p>
            </div>
        </div>
    );
};

Card.defaultProps = {
  name: "Diksha",
  img : "<https://images.pexels.com/photos/1144170/pexels-photo-1144170.jpeg?auto=compress&cs=tinysrgb&w=600>",
    work: "Student",
    hobby: "Dancing",
    origin: "India"
}

export default Card;
Just before exporting the component, we set default values for the props toward the end of our code.
To declare default props, we used the component's name followed by a dot and then defaultProps.
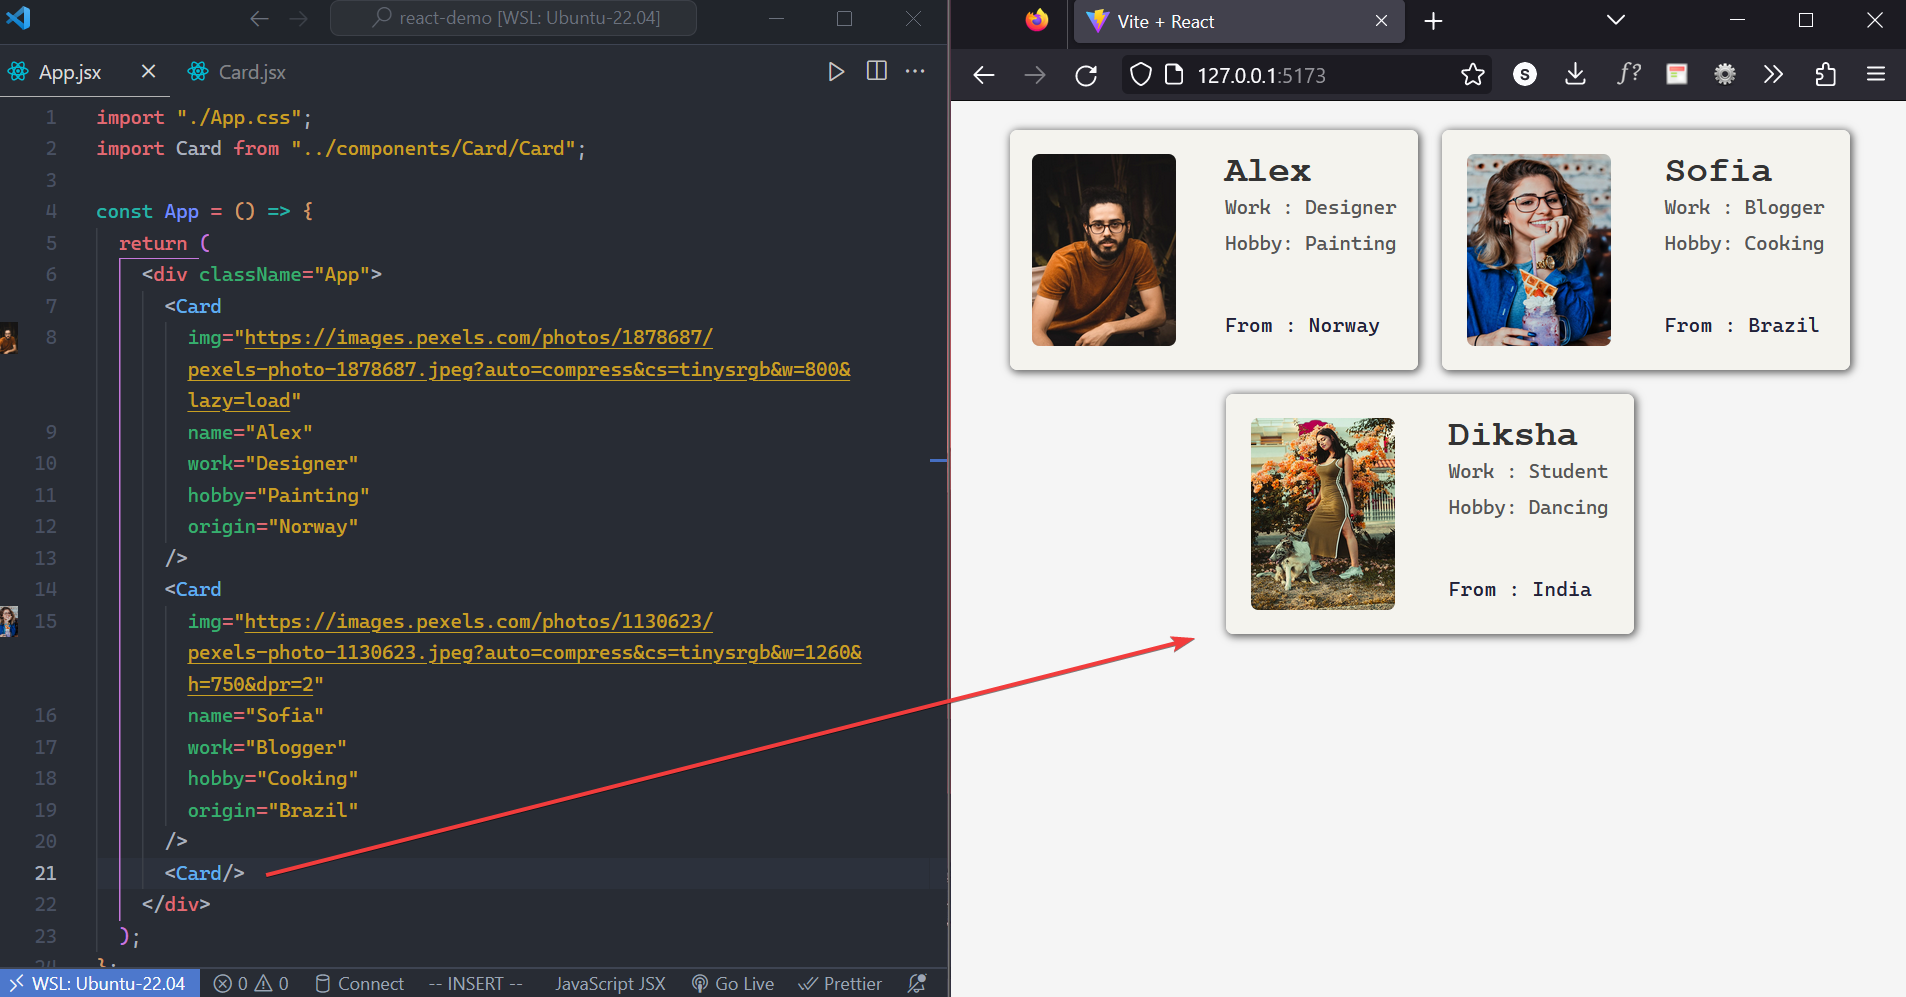
With this, everywhere we import this component, these values will be the initial values, thus we won't have an empty prop. The default settings, however, are then overridden when we pass data into it.
For Example, in the below example, I did not pass any prop for the last card in App.jsx.
Wrapping Up
As a beginner, this article covered all the necessary information about props, including their definition and usage.
Please share this article if you found it helpful. Thanks for reading!